Automated Labeling System
This section features images and a video documenting our team's development process for an automated labeling prototype, designed to enhance a company’s repackaging workflow. We engineered a cost-effective, Arduino-controlled system that utilizes infrared sensors for product detection and stepper motors for precise label application. The solution was built to reduce manual labor, minimize labeling errors, and significantly improve operational speed and consistency.
*Credits: Prof. Kenichi Kato, Prof. Ang Chee Khian, Mr. Gary Lee Ngee Howe
Automated Labeling System
This section features images and a video documenting our team's development process for an automated labeling prototype, designed to enhance a company’s repackaging workflow. We engineered a cost-effective, Arduino-controlled system that utilizes infrared sensors for product detection and stepper motors for precise label application. The solution was built to reduce manual labor, minimize labeling errors, and significantly improve operational speed and consistency.
InflatAssist
This section showcases how our team developed a low-cost, ergonomic inflatable mattress system to assist nurses in repositioning large or immobile patients for basic care tasks such as changing clothes or diapers. The project focuses on reducing physical strain, improving single-staff usability, and addressing practical constraints in hospital ward environments. It was designed as part of our entry for the James Dyson Award, which encourages life-enhancing innovations through design and engineering.
Project Background
We began by looking into the types of projects that have previously done well in the James Dyson Award, and noticed a clear pattern—many successful entries tackled challenges in healthcare. Inspired by this trend and driven by a desire to create something people would actually use, we chose to explore the real-world problems faced by nurses.
Nurses play a vital role in the healthcare system. They are often the first and last point of contact for patients, and their responsibilities range from clinical care and patient education to emotional support and emergency response. However, they also work long shifts in demanding conditions, often performing physically strenuous tasks. One recurring issue we discovered was the difficulty of repositioning patients, especially those who are bedridden or larger in size. We knew this was something worth solving.
Design Process
Step 1: Domain Analysis
We started by learning more about the healthcare sector, focusing on the role of nurses and how they work. This helped us build a strong foundation before speaking to stakeholders or designing anything.
We looked into the daily responsibilities of nurses, which include tasks like checking on patients, planning their care, giving medication, helping with hygiene, and moving or repositioning them when needed.
We also explored important nursing values, such as putting the patient first, working as a team with others in the hospital, and using evidence or research to guide their actions.
To better understand who might use our solution, we studied the types of nurses, such as:
-
Registered Nurses (RNs) – who handle most of the care and decision-making.
-
Licensed Nurses – who work under supervision.
-
Advanced Practice Nurses – who focus on specialized areas like critical care.
This research helped us ask better questions later on and made sure that whatever we designed would fit well into the nurses' day-to-day work.
Step 2: Stakeholder Interview
We spoke to a student nurse working in the Medical-Surgical Ward at Changi General Hospital, to better understand the real challenges nurses face on the job.
From our conversation, we learned that:
-
It’s hard for nurses to reposition heavier patients without help from others.
-
Tasks like changing diapers or clothes for heavier patients are difficult and take a lot of time.
-
Hospital wards are tight on space, so there isn’t room for large tools or machines.
-
Wearing PPE for long periods can be uncomfortable.
-
Nursing students often feel unprepared to help with more physical tasks.
This interview gave us a clear direction. We chose to focus on the lifting and repositioning patients issue, as we viewed it as a major and common issue and it was something we could realistically work on solving.
Step 3: Needs Formation and Validation
After gathering insights, we translated these observations into a set of concrete design needs.
These included:
-
A tool that is easy for nurses to use without extensive training.
-
A solution that minimizes the risk of back strain or injury.
-
A design compact enough to be used right at the bedside.
-
A system that works with just one nurse, reducing strain on already limited manpower.
-
Cleanliness and hygiene had to be easy to maintain.
-
The patient’s dignity and comfort had to be respected throughout.
A follow-up validation interview was conducted, where he confirmed that we were on the right track. He emphasized the importance of pressure injury prevention and reducing unnecessary lifting all of which reinforced our direction.
Step 4: Literacy Review & Market Survey
To ensure we weren’t solving a problem that had already been solved, we did a literature review and market survey.
We came across statistics showing that musculoskeletal injuries are extremely common among healthcare workers, reinforcing that this was not just an inconvenience—it was a serious workplace health issue.

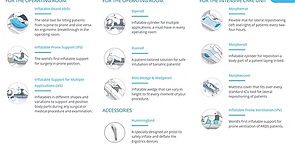
We also found several existing solutions, including:
-
U-shaped turning pillows,
-
Bed transfer belts, and
-
High-tech devices like those from Ergotrics, designed for ICU use.
However, most of these tools shared the same core flaw—they still relied on patient cooperation to be effective. If a patient couldn’t lift themselves even slightly, the tool often became ineffective or required extra nurses to operate. Some tools also required ceiling-mounted rails, expensive air pumps, or had limited portability, making them impractical for general ward use.

Step 5: Ideating a Solution
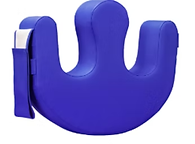
With all this information, we set out to design something new. Our concept was a simple inflatable repositioning system. The idea was to place air chambers (bolsters and pillows) beneath the patient, which could be inflated or deflated as needed to gently shift or tilt the patient’s body.
The system would:
-
Use slip-on sheets to reduce friction and help the patient roll naturally.
-
Be powered by a small, portable air pump.
-
Be modular, lightweight, and easy to clean.
-
Avoid the need for ceiling rails or large-scale hospital infrastructure.
In short, we wanted something practical, affordable, and usable in real-world ward conditions.
Step 6: Feasibility & Planning the MVP
Before building, we needed to check whether our idea was actually buildable with the resources available.
We researched the components:
-
Inflatable air cushions and bolsters
-
Tubing and valves
-
Compact air pumps
-
Smooth, low-friction sheets
All of these parts were available online or through common medical suppliers, and they were relatively affordable. This confirmed that we could build a minimum viable product (MVP) without needing custom manufacturing or expensive tech.
Step 7: Prototype/Proof of Concept
Once we validated the feasibility, we started sketching and mocking up the design. We created low-fidelity prototypes to test the positioning, layout, and inflation mechanics. We also modeled the design using SolidWorks, helping us refine dimensions and connections digitally before building the real thing.


Sketch
SolidWorks Design
The next phase will involve creating a functional prototype, testing it with nursing students, and collecting user feedback. From there, we hope to refine the product further and eventually test it in a real hospital setting.
After receiving approval to proceed with our idea, we created the functional prototype and started testing on ourselves and our classmates to simulate real procedures performed in hospitals by nurses to rotate their patients.
Deflated

Inflated

Step 8: Stakeholder Validation
To evaluate the effectiveness of our prototype, we conducted a stakeholder validation session.
Feedback was obtained through a brief interview and hands-on demonstration. Overall, our stakeholders agreed that the solution fulfilled the intended objective of assisting patient rotation.
However, two key areas of concern were highlighted:
-
The time taken for the device to inflate.
-
The possibility of the patient shifting out of position during the process.
These insights are crucial as they highlight real-world limitations that could affect usability in a Hospital setting.

Step 9: Future Developments
1. Faster Inflation Mechanism:
-
Exploring more powerful pumps or using Hospital beside air line if available, as an alternative to the current portable pump, which could significantly reduce inflation time.
2. Patient Positioning Solutions:
-
Initially, we selected the EasySlide material, a microfiber (polyester) with padded layers and a specialized Ultra Low Friction (ULF) surface, to allow the device to be easily slid under the patient when needed. However, after testing and stakeholder interviews, we found that leaving the device permanently in place under each patient bed is more practical. As a result, in future iterations, we will consider replacing the EasySlide material with one that offers higher friction. This will help maintain patient positioning during inflation and reduce the risk of unintentional sliding.
3. Automated Valve Control:
-
At present, the valves are manually operated to inflate or deflate individual bolsters at specific intervals. In future iterations, these valves could be upgraded to an automated system that can be controlled via a device, allowing users to select patient positions and automatically inflate or deflate the corresponding bolsters.
-
Currently, the speed and pressure of airflow during inflation and deflation are manually regulated by adjusting the degree to which the valves are opened. This aspect can also be automated to precisely control and display the airflow rate and internal pressure of each bolster. This air pressure can also be controlled and regulated by the system for each patient’s personal needs.